Scene
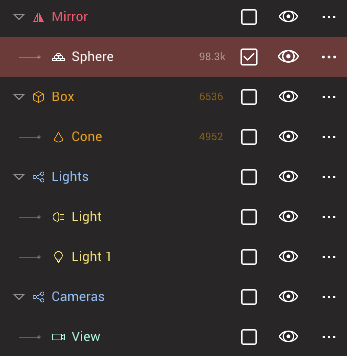
This menu lets you manage the different objects that you might have in Nomad. It displays the scene hierarchy as a tree-view, allowing you to modify many aspects of your objects.
Shortcut bar
| Action | Icon | Description |
|---|---|---|
| Add... |  | Display the Add Menu to add an object to the scene |
| Delete |  | Delete the object |
| Join |  | Join the selected objects into a single object with no geometry changes |
| Separate |  | If an object is made up of unique polygon shells, break it into separate objects. The reverse of the join operation |
| Boolean... |  | Display the Boolean menu |
| Clone |  | Duplicate the object into a new object |
| Instance |  | Duplicate the object as an instance, so modelling changes to one are made to all instances. |
| Un-instance |  | Convert an instance to a unique shape, so modelling changes are no longer copied to other instances. |
Tree view
| Action | Icon | Description |
|---|---|---|
| Select |  | Toggle select/unselected |
| Visible |  | Toggle visibility |
| Menu |  | Display object menu |
TIP: Quickly select or hide many objects
Tap the select icon to toggle a single object, or drag vertically on the select column to select many objects. The same can be done with the visible column.
Tree view manipulation
Long press on an item in the tree view until it turns yellow. You can then move it up or down in the tree view, as well as drag it over another item to make it a child of that item.
When many items are selected, most will be a dark yellow, one will be a lighter yellow. Long press and drag on the lighter item to move all the objects at once.
When you select a parent item, by default all the child items will also be selected. Tapping the parent icon will toggle between selecting just the parent, or the parent and children.
Object menu
Clicking the elipsis button (...) for an object in the tree view will show the object menu. Many of these options are similar to the shortcut bar at the top, repeated for convenience.
| Action | Icon | Description |
|---|---|---|
| Instance | | Duplicate the object as an instance, so modelling changes to one are made to all instances. |
| Clone | | Duplicate the object into a new object |
| Name |  | Change the name of the object |
| Delete | | Delete the object |
| Delete+ | | Delete the object and its children |
| Un-instance | | Convert an instance to a unique shape, so modelling changes are no longer copied to other instances. |
| Separate |  | If an object is made up of unique polygon shells, break it into separate objects. The reverse of the join operation. |
Multiselection
You can select multiple objects to help achieve two things:
- using the gizmo tool to move several objects at once
- merge objects using join and boolean operations.
You can do that by using the Multiselection checkbox, and then by clicking on the object in the list.
Quick multiselection
You can also multiselect in the viewport by holding the Smooth shortcut and tapping on another mesh.
You can deselect an object by tapping on it again (only if your selection has more than one object).
Limited gizmo feature
When using multiselection, the gizmo tool will always ignore masking. Also, X/Y/Z scaling is removed.
The reason is that multiselection only allows whole mesh transformation, not per vertex transformation. This might be improved in the future.
Join
This option will simply make one single object entry from multiple selected objects.
You can see an example in video in the Separate section.
Boolean
 Combine objects into a single surface either through a
 Voxel Merge or a Boolean operation.
Voxel merge will retain the volume of the objects, and calculate new evenly spaced polygons on the surface. Because of the calculation step a voxel merge can handle complex geometry, but can lose fine detail if the target resolution isn't high enough.
Boolean will attempt to leave the polygons in their original layout, and stitch the polygons where objects overlap. This can make much cleaner and sharper results than a voxel merge, however it requires 'watertight' meshes; there cannot be holes or malformed shapes in the objects. If this fails, usually a voxel merge will work.
Boolean operations
Both Voxel Merge and Boolean will use object visibility to control the operation:
Union
Both objects visible will create a boolean union, the outer skin of the objects are combined, with no interior surfaces. 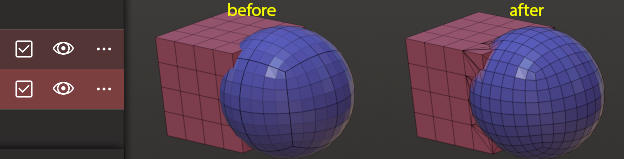
Subtract
One object invisible = boolean subtract, the invisible object will be subtracted from the visible object. 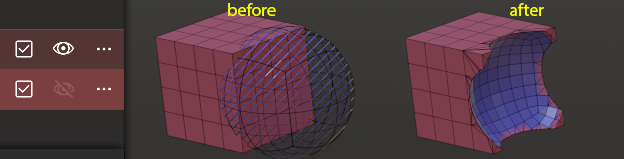
Intersect
Both objects invisible = boolean intersection, create a new shape only where the two objects overlap. 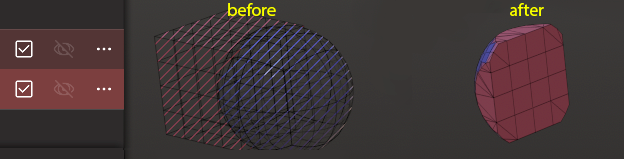
Voxel Merge Button
Pressing this button will do a voxel merge operation on the selected objects. When done on a single object it will retopologize into evenly spaced polygons, useful for when an object has stretched polygons.
Resolution
The resolution of the voxel 3d grid used to do the calculation. When this value is changed, a checkerboard pattern is overlayed on the object to preview the size of the polygons.
Build multiresolution
Create multiresolution levels below your target resolution. So if your resolution is 400 and build multiresolution is 3, you will get a new mesh with say 296,000 polygons, but there will 3 subdiv levels lower at 74,000, 18,000, 4,000k.
Keep sharp edges
Enable snapping the voxel mesh to edges. This works best on simple shapes.
Boolean button
Pressing this button will do a polygon boolean operation using the Manifold library by Emmett Lalish.
Separate
If you have a single object based on several disconnected parts, you can split this object into several objects. This can be seen as the opposite of Simple Merging.
Add menu
This menu will create primitives, which are basic shape types that can be adjusted using parameters. Once you have the primitive adjusted to your needs, you then 'validate' it, which bakes those parameters, so that you can sculpt or paint it. A primitive cannot have its parameters adjusted after it has been validated.
This menu also allows you to create cameras, lights, and special object types to control other objects, called groups and repeaters.

On gizmo
Enable putting the new primitive where the current selected shape or gizmo is. When disabled, the primitive will be placed at the center of the scene.
Select gizmo
Enable automatically switching to the gizmo tool when a new primitive is created.
UV's
Enable uv's on primitives. UV's (often called texture coordinates), and are extra data used in 3d to allow textures to be applied to surfaces. They take up more memory, but for most devices this shouldn't be a concern unless you're getting into very high poly counts (eg 10 million polys or more).
| Primitive | Icon | Description |
|---|---|---|
| Box |  | It's a simple cube, you can control the division in X, Y and Z |
| Sphere |  | For convenience this is named a Sphere but it is actually a subdivided box, with the Project on sphere forced |
| Cylinder |  | You can add a center hole for the cylinder primitive, for example to make an hollow pipe |
| Torus |  | The torus can be a good starting point for rings |
| Cone |  | - |
| Icosahedron |  | - |
| UV-sphere | | You should probably not use this primitive, see Warning below |
| Plane |  | It's a simple plane, note that this is the only primitive that is not closed |
| Triplanar |  | A special primitive, see Triplanar |
| Head |  | - |
TIP
If you wonder what is the base mesh when you launch Nomad: this is a subdivided box as well. However the base mesh in Nomad doesn't use Project on sphere, meaning it is not perfectly round.
Primitive Config
Here are a some options that you can find in some primitive:
Flat subdivisionPreserve hard-edges by not smoothing the mesh when subdividingOverall subdivisionThe number of subdivisionConstant densityIt means that the topology of the primitive will be kept uniform when you play with the settingsProject on sphereTo get a perfect geometrical sphere but keeping the underlying primitive topology
UV Sphere
WARNING
You should probably never use it, the topology of the UV Sphere is not well suited for sculpting, especially on the poles.
Please prefer the Sphere, Box or Icosahedron primitive, along with the Project on sphere option.
Note that the topology can be acceptable for sculpting if you use a very low value for the Division sliders. You can then use the Overall Subdivision slider to raise the number of polygons.
Triplanar
This primitive is special in that you should use the Masking tool on it to shape the geometry.
TIP
Double-tap on a plane and the camera will focus on this particular plane. This won't work if you rotate the primitive with the gizmo though.
Triplanar is using the mask information from 3 planes to fill a voxel grid that is then polygonized (thanks to the Voxel Remesher).
Each plane has its own symmetry plane.
WARNING
Each time you update the size of the Triplanar primitive, the quality of the mask painting will degrade.
For now there is no option to 'lock' the painting on a single plane, but maybe it will come in the future. You can use the Connected Topology to help a little bit, in that if your cursor lies precisely on one plane it won't impact the other planes.
Keep primitive UVs
Enable adding UVs to certain primitives on creation. Currently this is Box, Sphere, Icosehedron, Plane.
Group/Camera
Group
Create an 'empty' object, that you can parent other objects underneath. This can be used to simply organise the hierarchy by putting many objects under a group, then closing it. A group can also be used as a helper for moving objects; many objects can be placed under a group, and then the group moved, rotated, scaled with the gizmo tool.
Add view
Create a camera.
Repeaters
Repeaters are nodes that make instances of objects below it.
Array
When objects are made children of this node, they can be instanced into a grid layout. When selected, it has controls for:
- Fit inside - toggle between controlling the size of the grid/box of the array, or controlling the space between the array instances
- CountX/Y/Z - the number of instances on each axis
- OffsetX/Y/Z - distance between the instances when fit inside is toggled
- SizeX/Y/Z - the width/height/depth of the total array grid when fit inside is toggled.
Curve
This will create a curve, children of this node will be repeated along the curve. When selected, it has controls for:
- Edit - allow adding of points to the curve, and moving points on the curve.
- Snap - will snap curve points to other geometry
- Align - will rotate child shapes to align in the directon of the curve
- Count - the number of instances
- Closed - Toggle the curve to join the start and end, or to be an open curve
- Radius - Toggle controls on each curve point to control the scale of the instances
- Twist - Toggle controls on each curve point to control the twist rotation of the instances
- B-spline - Toggle the instances to follow the curve exactly, or use b-spline interpolation which has smoother results.
Radial
Children of this node will be instanced into a circle. When selected, it has controls for:
- RadialX/Y/Z - selecting these buttons will set the radial axis, and set the number of instances.
Mirror
Children of this node will be mirrored across an axis. When selected it has controls for:
- Gizmo - enable the transform gizmo to set the center of the mirror. This can also be rotated and scaled. When done, tap gizmo again to reveal the standard controls.
- X/Y/Z - set the mirror plane
All the repeaters have a Validate control, which will bake the results of the repeater, and will ask how to perform the bake:
- Join children - the instances are joined into a single object
- Keep instances - the instances remain as instances, but are no longer have the repeater 'parent'
- Un-instances - the instances are converted into unique objects
Light
Directional
Create a directional light, an infinitely far away light source like the sun.
Spot
Create a spot light, with controls over the cone width, softness
Point
Create a point light
Advanced
Focus on item
Sync visibility
Icon size
Set the size of the group, light, camera, mirror icons in the viewport
Hierarchy lines
Display a line between parent and its children in the viewport
Use Nomad pivot
The Nomad pivot is the pivot used by the Transform and Gizmo tools. If this option is disabled, it wull us the natural base pivo. In some cases this base pivot can be far away from the object center itself!
Bottom toolbar
These icons will toggle visibility of Group, Light, Canera, Repeater and Hierarchy lines in the viewport.